云服务以阿里云为例,请根据实际情况使用合适的服务器配置。建议4核CPU + 4GiB起步
私有IP:172.27..153 ;公有IP:139.196..228
部署方式
- 后端服务通过JAR方式运行 (部署到 18080 端口)
- 前端项目build的dist文件夹(Nginx部署到 3100 端口)
资源准备
在服务器root下面新建 /srv/www/project 目录,上传准备下面内容
- 后端 jar 包
- 前端dist包
- 数据库sql文件(结构和数据)
环境配置
MySQL安装配置与初始化
安装数据库→设置root密码→开启数据库ssh连接(可选)→创建项目数据库(jeecg-boot等)→运行sql文件→重启数据库→设置开机自启
sudo yum install mysql
ALTER USER 'root'@'localhost' IDENTIFIED BY 'yourpassword';
mysql -u root -p
CREATE DATABASE `jeecg-boot` CHARACTER SET utf8mb4 COLLATE utf8mb4_unicode_ci;
USE jeecg-boot;
SOURCE /path/jeecg-boot.sql;
SHOW TABLES;
sudo systemctl start mysql
Nginx安装与配置
sudo apt install nginx
ps -ef|grep nginx
sudo systemctl reload nginx
sudo systemctl restart nginx
sudo nginx -t
sudo systemctl status nginx
nginx.conf配置部署前端
user www-data; # Nginx 进程的运行用户
worker_processes auto; # 自动设置工作进程数
pid /run/nginx.pid; # PID 文件路径
error_log /var/log/nginx/error.log; # 错误日志路径
include /etc/nginx/modules-enabled/*.conf; # 加载启用的 Nginx 模块配置
events {
worker_connections 768; # 每个工作进程的最大连接数
}
http {
## 基本设置 ##
sendfile on; # 开启高效文件传输
tcp_nopush on; # 优化 TCP 传输性能
types_hash_max_size 2048; # MIME 类型哈希最大值
include /etc/nginx/mime.types; # 加载 MIME 类型配置
default_type application/octet-stream; # 默认 MIME 类型
access_log /var/log/nginx/access.log;
gzip on; # 启用 Gzip 压缩
server {
listen 3100;
server_name 139.196.*.228; # 使用公网 IP 或者域名
# 配置前端静态资源路径
root /srv/www/project/dist; # 设置前端打包后的资源文件夹路径
# 前端路由配置(如果使用 Vue、React 等 SPA)
location / {
try_files $uri $uri/ /index.html;
}
# 后端接口代理配置(后端服务运行在 18080 端口)
# 后端接口代理
location /jeecgboot/ {
proxy_pass http://127.0.0.1:18080/jeecg-boot/; # 转发到后端服务
proxy_redirect off;
# 添加跨域响应头
add_header Access-Control-Allow-Origin *;
add_header Access-Control-Allow-Methods GET,POST,PUT,DELETE,OPTIONS;
add_header Access-Control-Allow-Headers *;
add_header Access-Control-Allow-Credentials true;
# OPTIONS 请求快速返回
if ($request_method = 'OPTIONS') {
return 204;
}
}
# 错误页面配置
error_page 500 502 503 504 /50x.html;
location = /50x.html {
root /usr/share/nginx/html; # 默认错误页面路径
}
}
# 其他配置
include /etc/nginx/conf.d/*.conf;
include /etc/nginx/sites-enabled/*;
}
访问前端 :http://你的公网IP:3100/出现下面页面则前端部署成功
Redis安装与配置
安装后端口默认和密码为空即可
ps -ef | grep redis
sudo yum install redis -y
redis-server --version
sudo systemctl start redis
sudo systemctl enable redis  # 设置开机自启
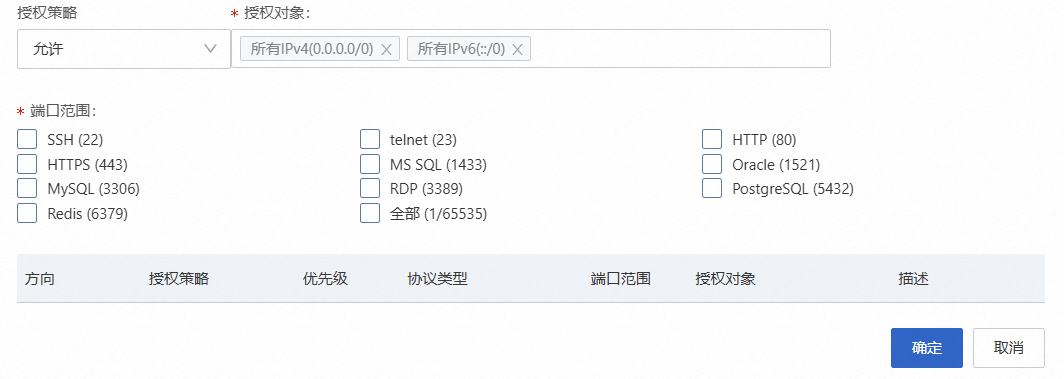
防火墙或安全组端口开放
对IPv4和IPv6确保至少开放以下端口:
80 ,8080,3306 ,18080,3100,3300,8092,6379
sudo iptables -A INPUT -p tcp --dport 18080 -j ACCEPT
sudo iptables -A INPUT -p tcp --dport 3100 -j ACCEPT
sudo iptables-save > /etc/sysconfig/iptables
sudo netstat -tuln | grep 18080
sudo iptables -L -n
sudo systemctl restart iptables

部署后端
#Window启动命令:
java -jar jeecg-system-start-3.*.*.jar
#Linux下后台进程启动命令:
nohup java -jar jeecg-system-start-3.*.*.jar >catalina.out 2>&1 &
#检查catalina.out确保你的后端以及部署成功
关掉项目:
ps -ef|grep java
kill 进程号
登陆访问
前端 :http://你的公网IP:3100/
后端:http://你的公网IP:18080/
清除冗余数据
登陆后清除病例表单,订单,工单,消息,通告等测试信息。
创建加密admin账户后自行创建部门用户权限等


